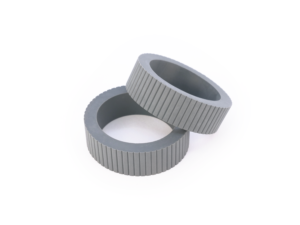
Feel like you’re slipping? Does life seem to be… spinning, out of control? Well get a grip, and do it with Mars tyres! These grey donuts of pure traction are the ideal way to put down the power of your Mars RB1806 and gearbox combo, or extract the most from any small robotics drivetrain!
Sold in pairs and ideal as either single tyres, or run them as dualies for the ultimate stiction!
These tyres are about 45mm in diameter as-is (unstretched), and we recommend stretching them to 50mm over a hub. You can go a little further, but ideally no further than 55mm. Whilst the stretch alone should provide plenty of grip on a hub, glue is recommended to create a robust wheel against side-loads or damage! And if you’re designing your wheel, why not design it around the Mars hub?
A single package contains:
- 2x Mars tyres
The key technical details are:
- Dimensions (unstretched) (OD*ID*W): ⌀~43.5*⌀~33.5*13mm
- Dimensions (stretched to 50mm) (OD*ID*W): ⌀50*⌀~41*~11.5mm
- Note that as you stretch the tyre, the wall thickness and width will decrease!
- Weight: 7.8g
- Hardness: ~30 Shore A
We have designed our own 3D printed TPU (flexible filament) centres to fit these tyres, making a compliant 50mm wheel and tyre ready to take a Mars hub. Whilst we don’t currently offer ready-made wheels, we’re happy to share the 3D model of our prototypes below for you to use with your Mars tyres, or just experiment with freely! Remember, if you need any 3D printing, we provide that as an affordable service too!
3D models (links to Google Drive):
Unstretched tyre / Tyre stretched to 50mm / Fancy compliant 3D printed centre (for 50mm wheel) / Basic 3D printed centre (for 50mm wheel)
A word on glue:
If you’re planning on using glue to bond your Mars tyres to a wheel, most types intended for use with rubber should work, but we have had especially good luck with thin “black” rubber glue (usually a cyanoacrylate derivative, which loves to stick to skin, so please take care). If you’re using our 3D printable prototype models above for your wheels (or using them as inspiration for your own), we developed a unique method of gluing the tyres which eliminates mess and the mild panic of a fast setting glue:
- Install your tyre over the 3D print first, ensuring it’s square and running true.
- Then flow some glue – using a thin nozzle/applicator – through the small holes in the perimeter of the 3D print, which lead to a tiny cavity between the tyre and print (the clever part!)
- Allow each hole and area within to fill before moving on – you don’t need much!
- Leave the glue to harden and bond fully before squeezing the wheel to avoid unwanted backflow through the holes.
- Enjoy a mess-free and slick looking wheel!
- Send us pics of your resulting wheels, we want to see what you come up with! @ranglebox or sales@ranglebox.com


